
Introduction
Automation mesh is a Red Hat Ansible Automation Platform feature that allows organizations to distribute automation workloads across hybrid cloud peer-to-peer connections with each other using existing networks. Automation mesh with Red Hat Ansible Automation Platform on Microsoft Azure empowers organizations to scale their automation with a single control plane two-fold:
- The Ansible Automation Platform on Azure architecture automatically scales based on automation workloads that it can directly automate against, through direct or transit routing, eliminating the need for customers to manage the automation infrastructure directly.
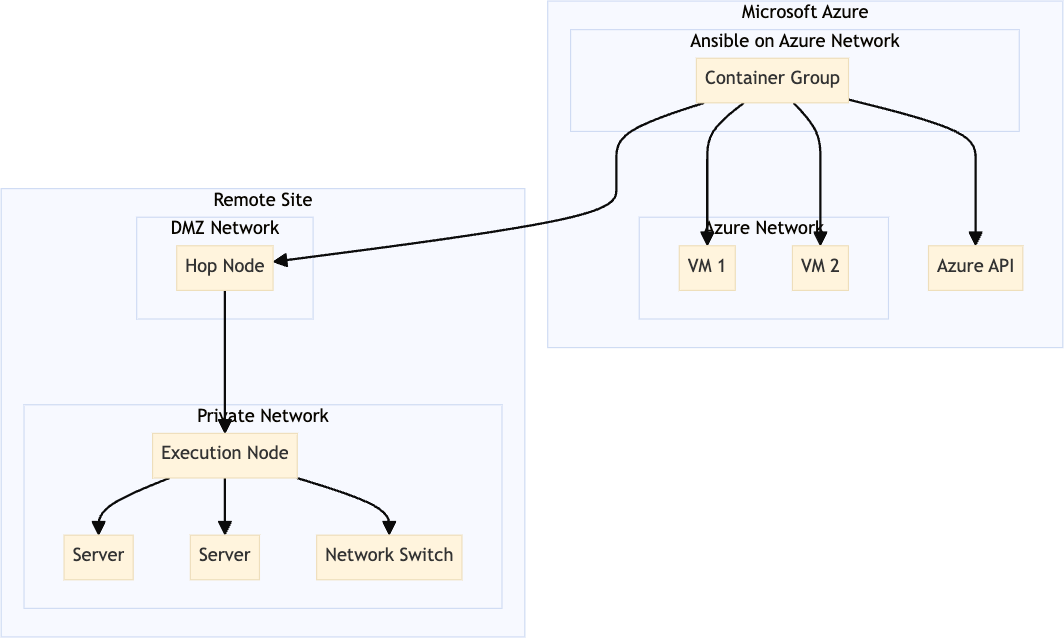
- When automation must run against resources in other data centers, at the edge, or in circumstances where Ansible Automation Platform on Azure cannot directly connect, then customers can configure an automation mesh execution plane connected to Ansible Automation Platform on Azure.
The automation mesh execution plane consists of two types of mesh nodes, hop nodes and execution nodes.
Hop nodes serve to facilitate communication with the execution nodes and route traffic to them.
Execution nodes run automation against the target endpoint resources.
Many organizations have hybrid cloud environments with workloads and resources in public cloud, private clouds, and across data centers. For them, the need to reach those networks and place execution nodes close to the automation endpoints is critical. An example of this type of configuration is below.
With the release of automation controller 4.5, the ability to implement hop nodes is now available for Ansible Automation Platform on Azure.
Your Ansible Automation Platform subscription grants you ten Red Hat Enterprise Linux (RHEL) licenses that may be used for running components of Ansible Automation Platform. In this example, we will leverage those licenses to implement automation mesh using a hop node and an execution node that runs in a remote site from our Ansible Automation Platform on Azure deployment.
Let’s walk through how to deploy this and take advantage of this capability.
Preparing the Network
The network configuration in these examples will use default ports for examples. Network configuration can be configured per the organization’s needs. For complex network configurations, use the automation mesh documentation for guidance.
Automation mesh uses TLS encryption for communication, so traffic that traverses external networks (the internet or other) will be encrypted in transit.
- The DMZ is open to port 27199 for traffic from the public internet that will allow for communication from the Ansible Automation Platform on Azure instance.
- Network traffic can route between the DMZ and the private network on port 27199.
- Network traffic within the private network can route on ports where automation occurs, such as 22 for SSH and 443 for APIs.
Also prepare resources, like a virtual machine, on the private network. In Ansible Automation Platform, create an inventory with the private resource using its private IP address or hostname.
Preparing the RHEL instances
There are many different ways that the automation mesh machines could be deployed and configured, including with more Ansible automation. For example purposes, we will describe the steps manually in this section. The following assumes RHEL 9 running on x64_64 architecture.
- Deploy the RHEL instances within the remote networks where communication is required.
- In the example above, one instance will reside within the DMZ network with a public IP address and one will reside on the private network.
- RHEL ISOs can be obtained from access.redhat.com.
- SSH into each of the RHEL instances and perform the following steps. Depending on your network access and controls, SSH proxies or other access models may be required.
Ensure that the RHEL instances are entitled through subscription-manager.
sudo subscription-manager register --auto-attachSubscribe to the Ansible Automation Platform repositories.
sudo subscription-manager repos --enable ansible-automation-platform-2.4-for-rhel-9-x86_64-rpmsInstall the ansible-core packages.
sudo dnf install -y ansible-coreInstall the ansible.receptor Ansible collection.
ansible-galaxy collection install ansible.receptor- Create or copy an SSH key that can be used to connect from the hop node to the execution node in later steps. This can be a temporary key used just for the automation mesh configuration, or a long-lived key. The SSH user and key will be used in later steps.
Open port 27199 for receptor communication.
sudo firewall-cmd --permanent --zone=public --add-port=27199/tcp
The RHEL instances should now be ready to run automation mesh.
Configuration in automation controller
We need to configure the nodes in automation controller. In our example we will deploy 1 hop node, and 1 execution node.
- Log in to automation controller.
- Navigate to “Instances” under the “Administration” menu.
- Click “Add”.
- Fill out the fields with the following to configure the execution node.
- Host name: <the private ip address of the host>
- Description: Execution node
- Listener Port: 27199
- Instance Type: Execution

- Click ”Save”.
- Click the “Install Bundle” icon to download the installation package. Save this for use in later steps.
- Click “Back to instances”.
- Click “Add”.
- Fill out the fields with the following to configure the hop node.
- Host name: <the public ip address or host name of the host>
- Description: Hop node
- Listener Port: 27199
- Instance Type: Hop
- Peers: Click the magnifying glass and select the execution node that was previously created
- Check the “Peers from control nodes” option
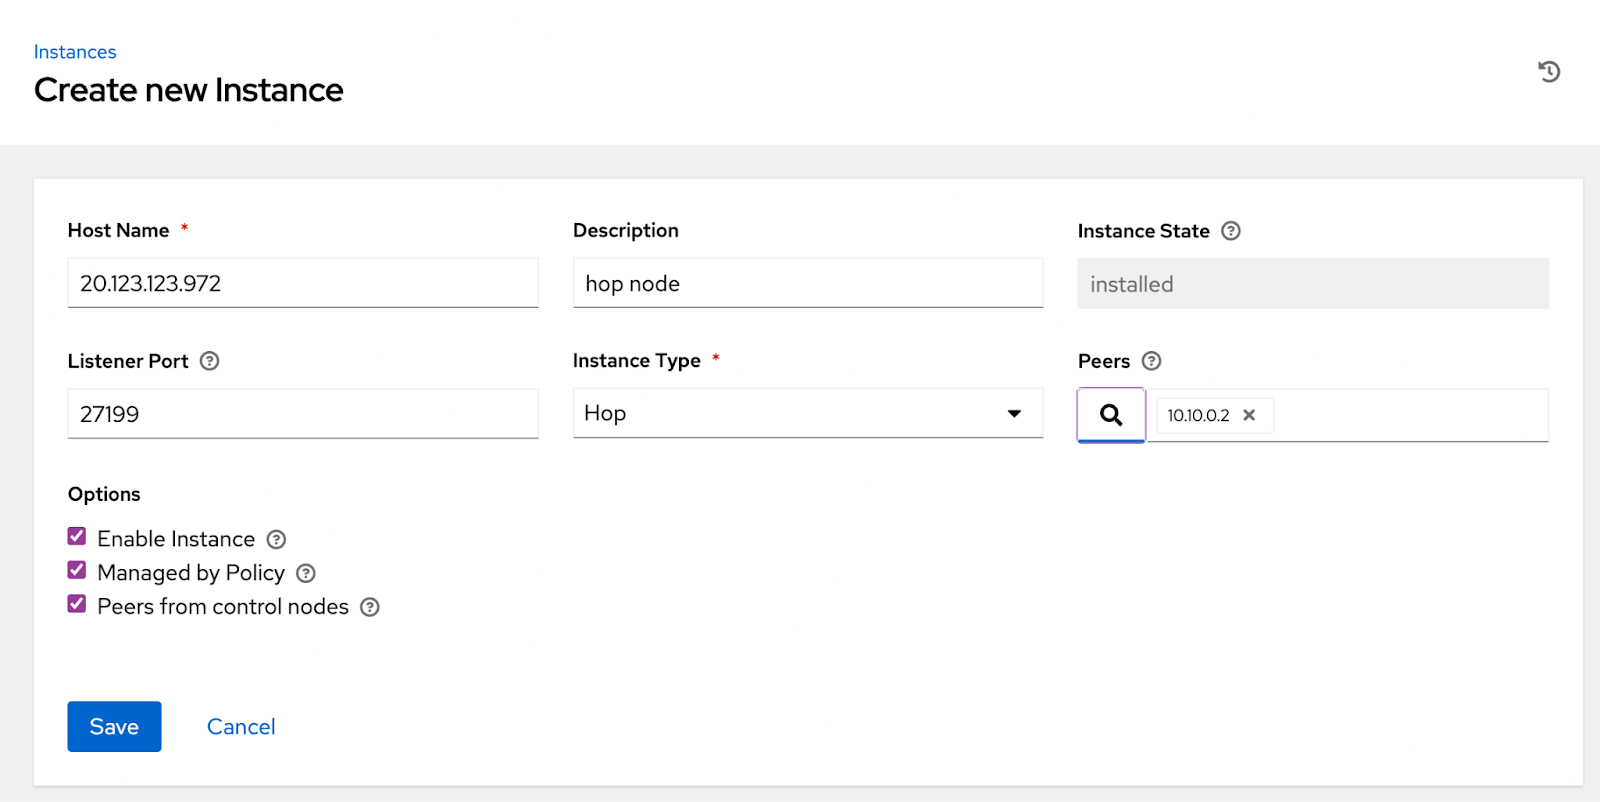
IP address in this screenshot is example only
- Click “Save”.
- Click the “Install Bundle” icon to download the installation package. Save this for use in later steps.
- Click on the “Topology View” menu item under “Administration”. You should see your automation mesh configuration in a tentative “installed” state.
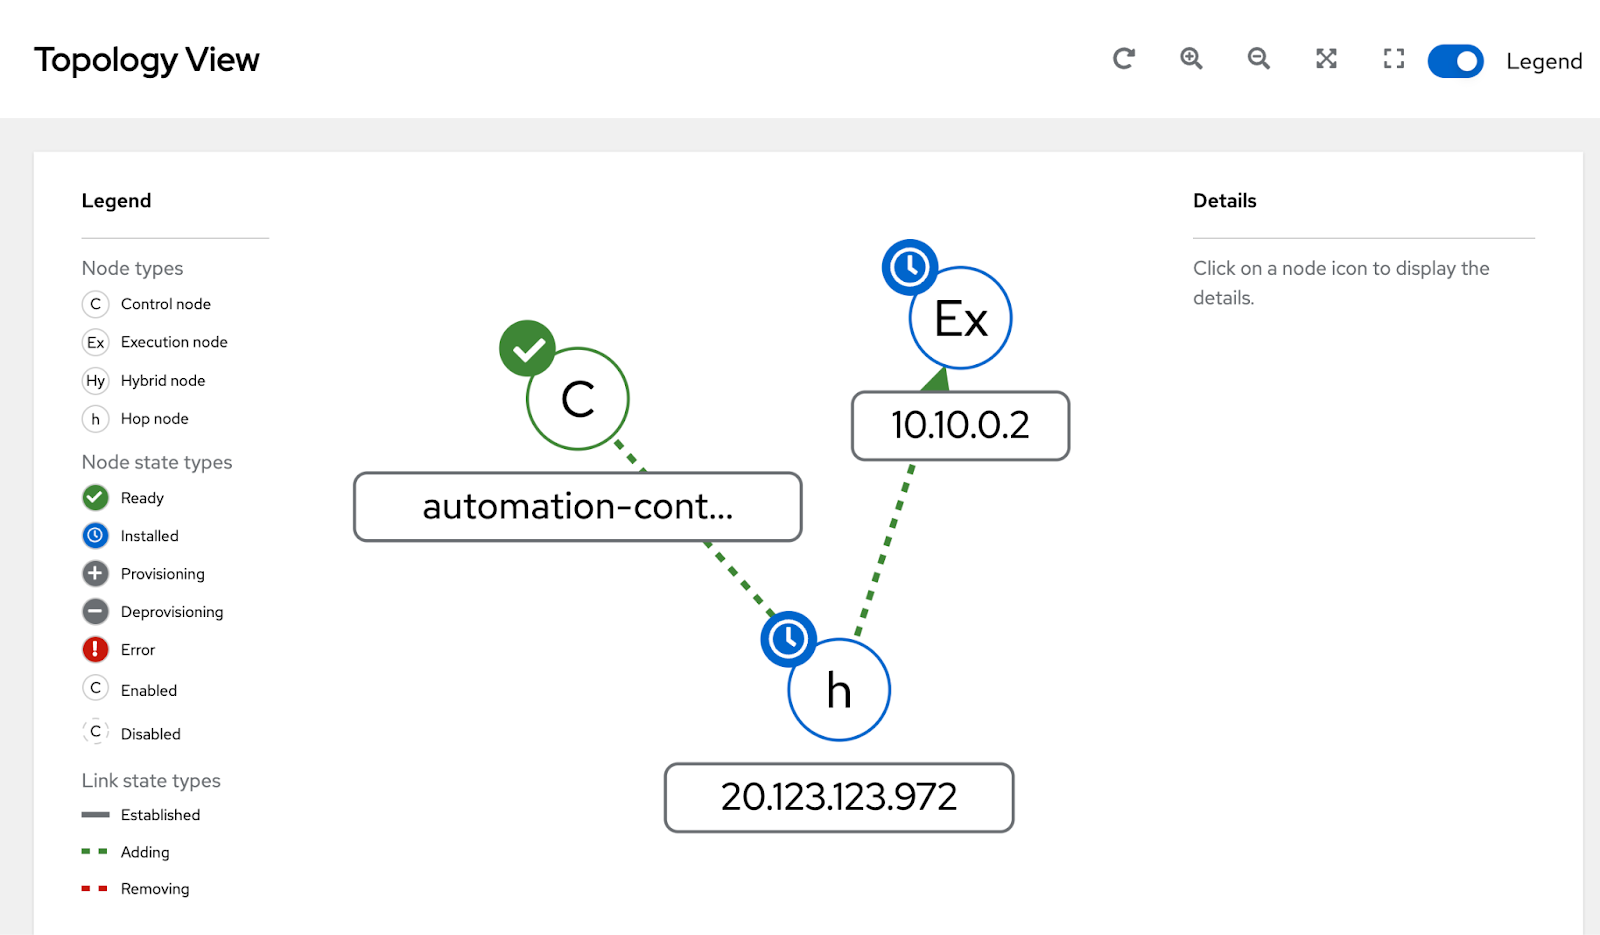
IP addresses in this screenshot are for example purposes only
Hop node IP address: 20.123.123.972
Execution Node IP address: 10.10.0.2
Installing the automation mesh bundles
The two bundles that were downloaded in the previous section use Ansible Automation Platform to set up each of these automation mesh nodes. Where you run these bundles will depend on your network access to the resources. In our example, we will assume that you have SSH access to the hop node and can run the bundle automation for both machines from the hop node.
- Copy both bundle files from your local machine to the hope node. Note that your IP addresses or hostnames will be unique to your environment.
scp /path/to/hop/bundle/20.123.123.972_install_bundle.tar.gz \ user@20.123.123.972

scp /path/to/exec/bundle/10.10.0.2_install_bundle.tar.gz user@20.123.123.972- Extract both tar.gz files.
tar -xzvf /path/to/hop/bundle/20.123.123.972_install_bundle.tar.gz
tar -xzvf /path/to/exec/bundle/10.10.0.2_install_bundle.tar.gz- Change into the directory of the execution node folder.
cd /path/to/exec/bundle/10.10.0.2_install_bundle- Open the inventory.yml file in a text editor.
vim /path/to/exec/bundle/10.10.0.2_install_bundle/inventory.yml- Change the user field so that it contains the SSH user for the execution node.
---
all:
  hosts:
    remote-execution:
      ansible_host: 10.10.0.2
      ansible_user: <username> # user provided
ansible_ssh_private_key_file: ~/.ssh/id_rsa- If required, change the name of the SSH key based on how you set up your SSH key on this host in earlier steps.
- Save the inventory.yml file.
- Run the playbook to install automation mesh on the execution node host.
ansible-playbook -i inventory.yml install_receptor.yml- When the installation completes, change into the directory for the hop node folder.
cd /path/to/hop/bundle/20.123.123.972_install_bundle- Open the inventory.yml file in a text editor.
vim /path/to/hop/bundle/20.123.123.972_install_bundle/inventory.yml- Change the user field so that it contains the SSH user for the hop node.
---
all:
  hosts:
    remote-execution:
      ansible_host: 20.123.123.972
      ansible_user: <username> # user provided
ansible_ssh_private_key_file: ~/.ssh/id_rsa- If required, change the name of the SSH key based on how you set up your SSH key on this host in earlier steps.
- Save the inventory.yml file.
- Run the playbook to install automation mesh on the hop node host.
ansible-playbook -i inventory.yml install_receptor.ymlVerify connectivity
- In your web browser, open automation controller again.
- Click on “Instances” under “Administration” in the left menu.
- Click the checkbox next to the execution node.
- Click “Run health check”. This step may take a few minutes.
- If the automation mesh is working correctly, then all nodes should have a “Ready” status.
Create an Instance Group
- Click on “Instance Groups” under “Administration”.
- Click “Add”.
- Click “Add instance group”.
- Create the instance group with the following fields:
- Name: Remote Network
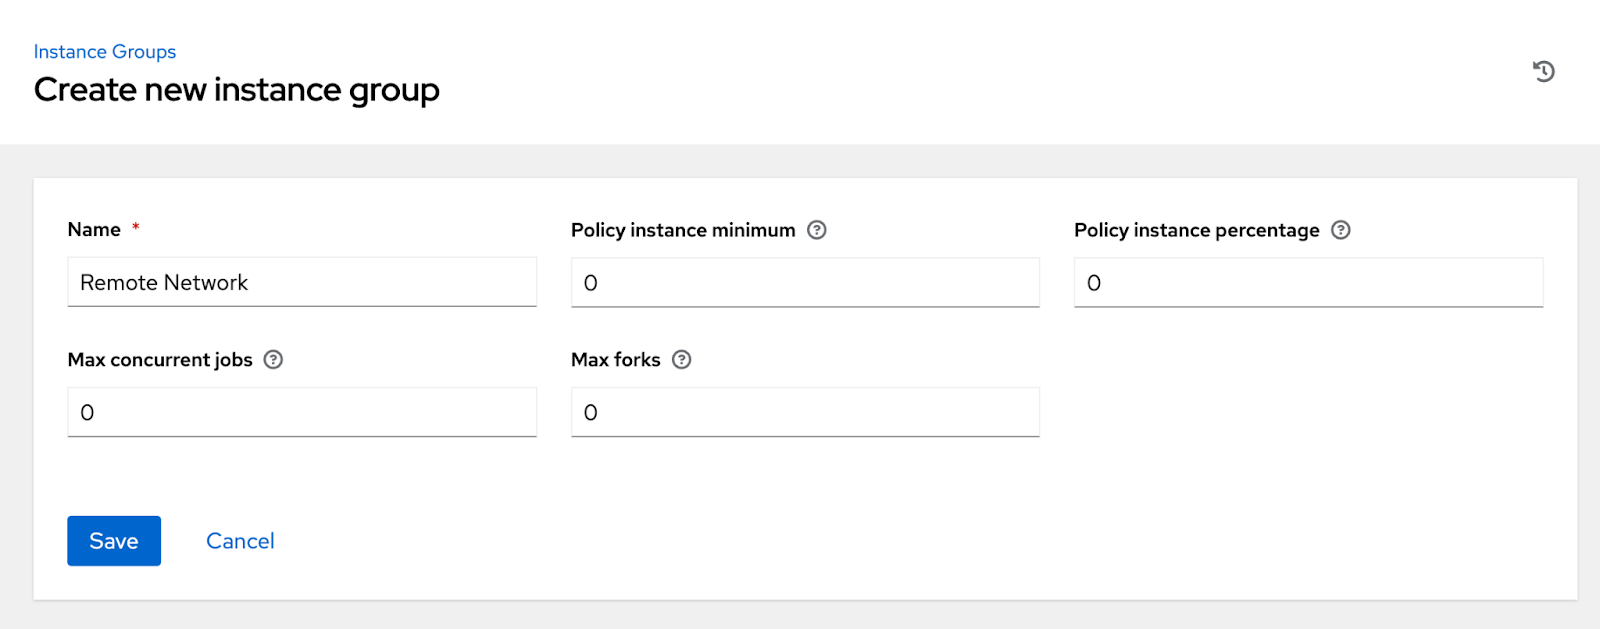
- Click “Save”.
- Click the “Instances” tab.
- Click “Associate”.
- Click the checkbox next to the execution node that was created.
- Click “Save”.
Demonstrate how this works
Now that we have configured the hop and execution nodes, let’s kick off some jobs from the automation controller and observe how they pass through the hop node, which in turn passes them to the execution nodes to run the automation tasks.
- Open the inventory that you created as a preparatory step to this guide.
- Click “Edit” to edit the inventory.
- Click the magnifying glass next to Instance Groups.
- Select the “Remote Network” instance group.
- Click “OK”
- Click “Save”
- Click on the “hosts” tab.
- Click the checkbox next to the VM host that you created on the private network.
- Click “Run Command”.
- Run the ping module against the host.
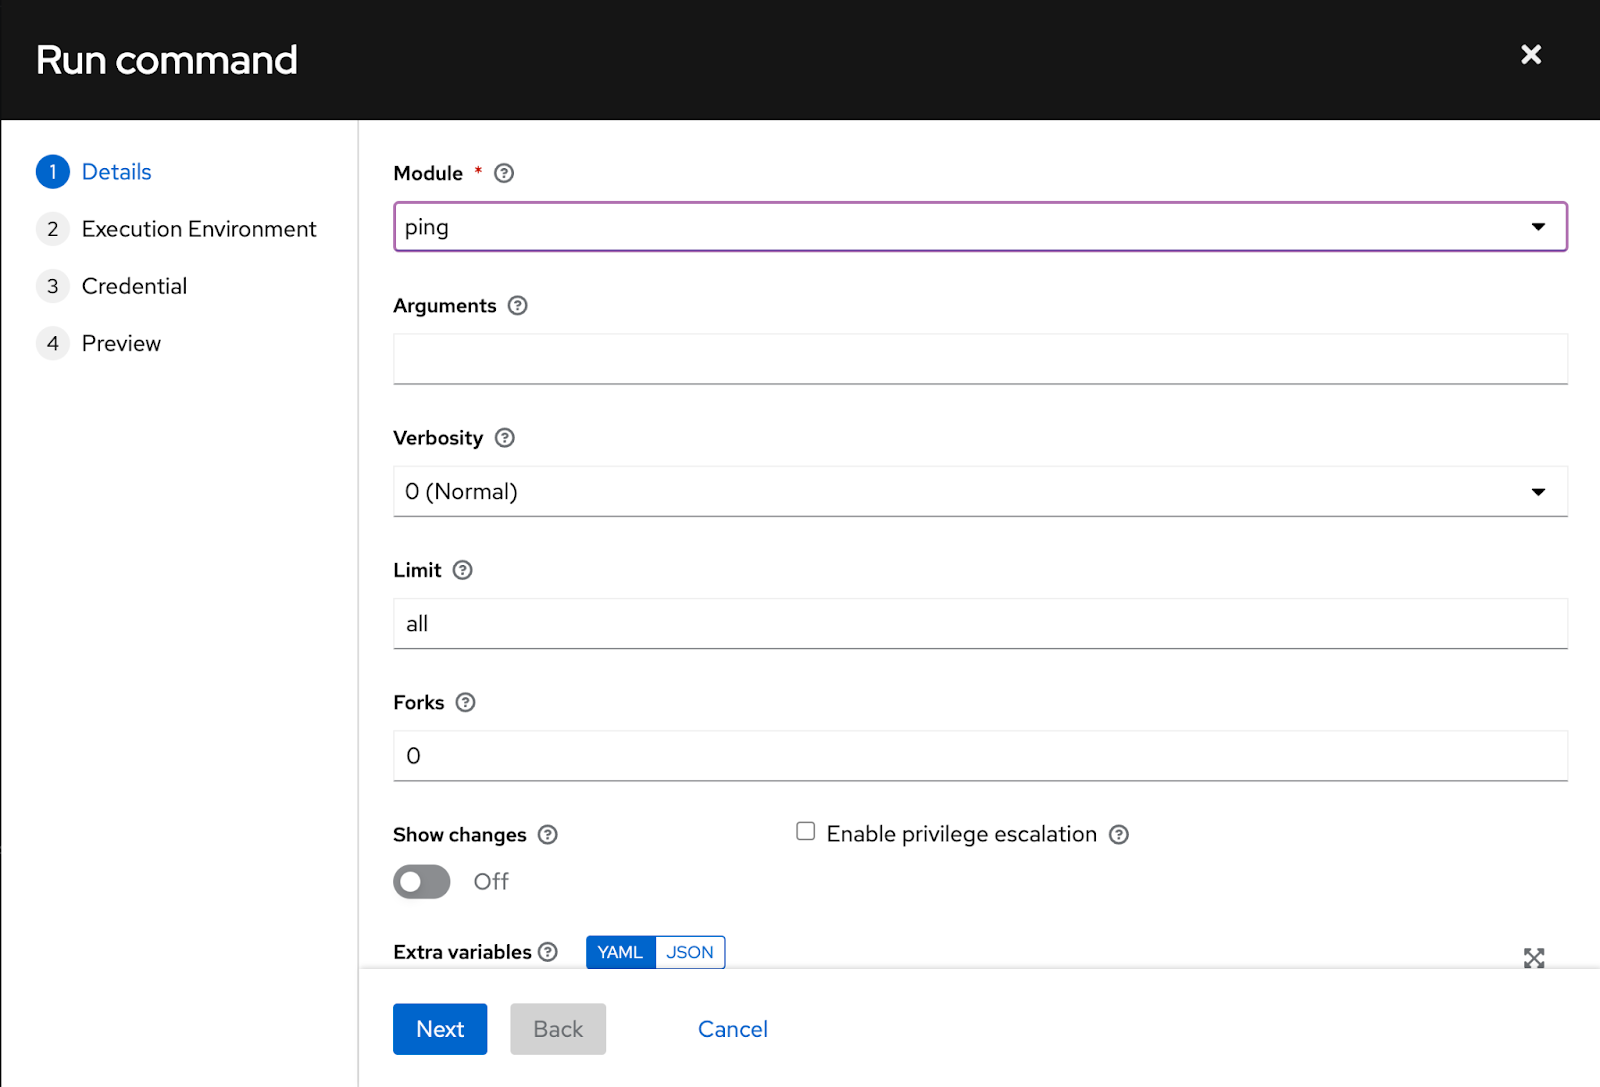
If the ping is successful, then automation mesh is configured properly. You may now run automation jobs against hosts on a private network.
What can I do next?
To learn more about Ansible Automation Platform on Azure, please visit the page here.
To learn more about automation mesh, please visit this guide.
To learn more about Ansible Automation Platform on other hyperscaler clouds, please visit the page here.
For hands-on self-paced lab(s) on Ansible Automation Platform please visit this page.
- A lab on Ansible Automation Platform on Azure.
- A lab on getting started with automation mesh.
- Documentation for Red Hat Ansible Automation Platform Automation Mesh for operator-based installations
- Documentation for Red Hat Ansible Automation Platform Automation Mesh for VM-based installations
About the authors

Hicham is responsible for technical marketing of the Red Hat Ansible Automation Platform on Clouds. Hicham has been in the software industry for over 20 years and for many of them focused on cloud management. Hicham has been a frequent presenter at events and conferences like VMworld, vForum, VMUG, VMLive, Gartner, Dell Technology World, AWS re:Invent, HPE Discover, Cloud Field Day, Red Hat Summit, AnsibleFest, in addition to Customer events.

Scott Harwell is a Principal Product Manager at Red Hat for Ansible on Clouds. His focus is the delivery of Ansible Automation Platform offerings on hyperscaler cloud vendors such as Microsoft Azure and AWS. Prior to joining Red Hat, Scott held product management, development, and consulting roles for Oracle, AST Corporation, Tech Machine, and Volvo. Scott is a cloud enthusiast with experience and certifications across many cloud providers. He is passionate about automation and likes to find creative ways to improve IT, technical, and business processes.
Browse by channel

Automation
The latest on IT automation for tech, teams, and environments

Artificial intelligence
Updates on the platforms that free customers to run AI workloads anywhere

Open hybrid cloud
Explore how we build a more flexible future with hybrid cloud

Security
The latest on how we reduce risks across environments and technologies

Edge computing
Updates on the platforms that simplify operations at the edge

Infrastructure
The latest on the world’s leading enterprise Linux platform

Applications
Inside our solutions to the toughest application challenges

Original shows
Entertaining stories from the makers and leaders in enterprise tech
Products
- Red Hat Enterprise Linux
- Red Hat OpenShift
- Red Hat Ansible Automation Platform
- Cloud services
- See all products
Tools
- Training and certification
- My account
- Customer support
- Developer resources
- Find a partner
- Red Hat Ecosystem Catalog
- Red Hat value calculator
- Documentation
Try, buy, & sell
Communicate
About Red Hat
We’re the world’s leading provider of enterprise open source solutions—including Linux, cloud, container, and Kubernetes. We deliver hardened solutions that make it easier for enterprises to work across platforms and environments, from the core datacenter to the network edge.
Select a language
Red Hat legal and privacy links
- About Red Hat
- Jobs
- Events
- Locations
- Contact Red Hat
- Red Hat Blog
- Diversity, equity, and inclusion
- Cool Stuff Store
- Red Hat Summit